55. Word Bird

It has been a hectic week so far.  I realised this morning that I didn’t have a make ready to publish so decided to take an hour out this afternoon to get one ready.  I enjoyed making this so much that I forgot to take photographs at each stage and totally lost track of time. That must be a sign of a good make.

The directions for this make are by Ann Ellis in the January/February 2012 issue of Cloth Paper Scissors

I started by roughly drawing a body, wing and beak shape on cardboard as Ann suggests.

Then I cut the shapes out:

and this is where I got lost in a dream of tissue paper and glue and forgot to take any more photographs.

The steps are very simple: tear up tissue paper, stick it to the body, wing and beak. Then embellish.

Attach the finished bird to a skewer or other handy stick and admire.

52. Hopes and Wishes Chest

And here we are at the last post of the made by pin year.  I’ve made it…or rather, I’ve made a year’s worth.

This last make is a Hope and Wishes Chest for the new year.

I bought some blank chest shaped boxes.  (I learned my lesson from the very first make – an attempt at making a box!)


I found that it if you aren’t going to paint these, it is best to cover them with very thin paper.

I used specially bought paper for the middle one above and it was too thick to stick down smoothly, especially over the curves.  The left hand one is covered with used stamps from around the world and the one on the right is covered in a replica of the very first copy of the Times of London.  ( I think this one is the most effective).

I then covered all of the paper with acrylic medium gel and left to dry.

After 24 hours, I printed, cut out and stuck on some words to the outside and a map to the inside of the lid.

This is when I discovered that the layer of paper had made the lids too thick to close over the bases easily. I remedied this by rubbing a candle over the parts that close which allowed them to open and close a lot easier.

I used them as gift boxes and hope they might be used to store the recipients hopes and dreams for the year ahead.

Happy New Year everyone!

46. Gift box made from Used Stamps

I’ve just got in under the wire with this week’s make.  All will become clear in a couple of weeks time.

I’ve collected stamps since I was a little girl. I had stamp albums that I inherited from my mum and dad and also collected used stamps for Blue Peter Christmas Appeals.  Old habits die hard.  I still can’t throw and envelope with a stamp away.  Nowadays the stamps go to whatever charity is collecting them.  The batch I used for this make included some that were damaged and of no use to collectors.

I started by taking the paper off the back of the stamp.  To do this, soak the stamp in a container of water.

This takes a few minutes.  When you can peel the paper off the stamp easily, dry the stamp by placing it face down on a towel, J cloth or paper towel.

While the stamps are drying find a suitable container that you can use to stick the stamps to.  I used a plastic container that had contained frosting.

When the stamps are dry fix them to the container one at a time. I used acrylic gel medium but you could use PVA glue or varnish.

When you have covered the whole container.  Paint over the stamps with a layer of your fixative.  Again, I used acrylic gel medium.

And here it is.  I’ll probably use it as a Christmas gift box.

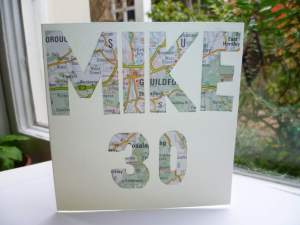
42. Card for Mike

One of the family has a big birthday this week and as he loves maps as much as I do,  I’ve made him a card using an old map and some cut out letters.

I learned how to make letters like this in art class in my first year of high school – one of the more useful things I learned in school.  When I was in school we made the squared paper from scratch but that is hardly necessary (I wonder why we did that???).

So, using some squared paper, I marked out the letters with a pencil and ruler. Then I cut them out. I found an old map featuring the town where Mike was born and grew up and placed the letters on the map.  I then drew around them with a pencil.  You could do this on the reverse of the map if you don’t want to get pencil marks on the front but I wanted to make sure I got the town centrally placed.

I cut out the letters on the map and stuck them to the front of a blank card.

40. A Fabric Banner

Our regular craft group met last week at Burnham Wellness Day.  We had a great turnout and lots of people stopped by our tables to see what we were making and have a chat.

One of the regulars asked me if I would help her to make a banner for a table top sale that she will be holding on behalf of our library.  She had been thinking that she would like me to paint the wording but the rest of the group thought that fabric would be better.  So, I brought it home and it has turned into this week’s make.

Esther gave me a tab top curtain to use as the banner.  I cut the letters out in paper first and then used these as patterns to cut out the fabric.

I pinned the fabric letters to the banner

I started to machine them on with zig zag stitch but found that the banner was so big the letters were falling off as I manoeuvered the fabric through the machine.  So, I tacked the letters in place before stitching.

And here is the finished banner:

Some of the letters are a bit wonky but I’m sure Esther won’t mind.


35. Paper Weaving

For this week’s make I’m going back to card making, this time with a paper weaving theme.

First of all find some interesting and colourful pictures that you can cut up.

I used an old calendar – sorry about the flash in this photograph.

Then cut the page into 1cm wide strips.  I used a guillotine as it was quick and easy.

Interweave the strips under and over each other.

Once you are happy with the size, shape and design, glue the front of a piece of folded card and stick on the woven paper.

34. Pen and Pencil Desk Tidy

My desk was a mess and had attracted a lot of pens, paintbrushes, scissors and other tools that I had dumped into 2 old coffee mugs.  I needed a desk tidy urgently and here it is:

I made it by cutting down a sturdy cardboard box.

I then took the box apart and opened it out.

Having a huge stock of old maps, I lined it with a piece from one of those.

Then I glued the box back together again.

Last year we visited the magnificent Abbaye de Fontevraud near Tours in France and I used some of the pictures from that trip to decorate the outside. As a backing I used a map of that region of France. Then I painted pva glue over the whole thing to protect the paper.

For the history buffs, the picture is Eleanor of Aquitane, wife of Henry II.

30. How to Cover Buttons With Fabric

Using self cover buttons can be a bit daunting if you’ve never done it but they really are very easy to make.  Not only do they look great on clothing but they can also be used to decorate bags, cushions even shoes. Here are some I made today. For these I used 4 19mm plastic self cover buttons. I’ve only ever used metal ones before so using plastic was new to me. The buttons come in two pieces and usually have a template on the card they come on that you can use as a pattern for the fabric you use. (If you are recycling old buttons and don’t have a pattern then just cut a circle about twice the diameter of the button. Undo the buttons from the card and cut out the template. Choose your fabric and place the template carefully so that the button will have the piece of fabric you want on the top.  For my buttons I used a scrap of vintage, 1980’s Laura Ashley fabric.

Cut out as many circles of fabric as you have buttons.

Sew a running stitch around the circumference of the circles leaving an end of thread at the beginning and end. (Use one length of thread for each circle as you will need to gather them.)

Now pull both ends of the thread to gather the fabric up into a cover for the button.

Place the top of the button into the fabric, pull the threads and knot them tight.

Snip the thread.

Snap the back of the button onto the piece you’ve just covered.

And hey presto!

4 beautiful self covered buttons.

My Folksy shop stock is sadly depleted so I think I’ll put these on there and see what happens.

29. Easy painting tool

I really wasn’t sure what to entitle this post – I’ve no idea what to call this make.

The best way to describe it is as great way for little hands to get painting.

I’ve always wondered what to do with old roll on deodorant containers and this week I had inspiration.  I had just come to the end of a Sanex Roll On and decided to see if I could make it into something.  I took it apart and washed it out.

Then filled the base with paint and water, mixed it up and put the container back together again.

The paint can then be rolled very easily onto paper.  Hopefully it won’t dry up either and we can use it again and again.  I will buy a different variety of the same deodorant next time and then we can make a collection that can be used for different coloured paints.

I imagine that it could also be used for glue.

27. Bowl made out of plastic bags

Our household loves to recycle and keeping stuff out of landfill occupies a lot of our energy. This week’s make recycles 2 different plastic items.

I save the plastic tops from milk and juice containers for a local charity. Up until now I’ve had a dish in the corner of my worktop that I throw them into after washing.  Yesterday, I needed to use the dish for something else so my collection of bottle tops was without a container.

I decided to make something to put them in using plastic carrier bags.  Those who know me will know that I’ve used this technique before when I made a shopping bag.  It was the source of much hilarity that I cut up carrier bags to make a carrier bag!

So this make is a bowl made out of 3 thin plastic bags.

First cut off the handles and the bottom bit where the seam is.

Start at the top and cut a thin strip about 1 inch/2.5 cm wide in a spiral until you have a long length of plastic that you can use like a length of yarn.

I used a 15mm crochet hook and made a circle (I won’t go into how to crochet as there are many, many videos on youtube that show how much better than I can explain here).

The picture above is one bag’s worth of yarn.

When the bowl was the diameter that I wanted – this took 2 carrier bags – I stopped increasing and started to make the sides which used up the third bag.

And here it is:

Some good news is that one of my lovely daughters (the master bag maker) has promised to do a guest make for this blog.  If anyone else would like to showcase a make please let me know!